Today I am going to teach you how to easily hack WPA/WPA2-PSK enabled
network using reaver. But, for that the targeted router should support
WPS(WiFi Protected Setup) which is supported by most of the router
nowadays. WPS is an optional device configuration protocol for wireless
access points which make it really easier to connect.
This feature exist in most of the router for the easy setup process through the WPS pin which is hard-coded into the wireless access point. Reaver takes the advantage of a vulnerability in WPS. Thanks to Craig Heffner for releasing an open-source version of this tool named Reaver that exploits the vulnerability. In simple tone, Reaver tries to bruteforce the pin; which in result reveal WPA or WPA2 password after enough time.
What You’ll Need
You do not have to be a expert at Linux or in even using computer. The simple command-line (console ) will do all the things. But you may need a lot of time for this process and also some luck. The brute force may take from 2 hours to more than 10 hours too sometimes. There are various ways to set up reaver but here are the requirement for this guide.
Now you should have a backtrack OS ready for action.
Step 1: Boot into BackTrack
You can use any method to boot into backtrack; like from live cd, VMware, dual boot, etc. So, just boot it first into the GUI mode and open up a new console(command line) which is in the taskbar. So just boot into backtrack. During the boot process, BackTrack will prompt you to to choose the boot options. Select “BackTrack Text – Default Boot Text Mode” and press Enter.
After some time Backtrack will take you into a command line prompt where you should type startx and press Enter. BackTrack will boot will into Graphical User Interface (GUI) mode.
Step 2: Install Reaver(Skip this step if you are using BackTrack 5)
Reaver should be already installed in the Backtrack 5 but if you are using older backtrack or any other Linux distribution you can install Reaver by using few steps below.
Step 3 : Gather Information
Before launching the Reaver attack you need to know your target wireless network name, BSSID ( it is the series of unique letters and number of a particular router) and its channel number. So to know this make your wireless card into monitor mode and gather the required information of the access points. So let us do all these things.
First lets find your wireless card. Inside terminal or console, type:

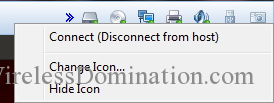
Note: To connect your wireless network card into WMware. Firstly, connect it to the USB and then you will see a small USB icon like in the figure in the top right of VMware. Then, right click on it and click connect. At last, USB sign will turn into green colour and start to glow.
Enable monitor mode. Supposing your wireless card interface name as wlan0, type this command in that same console.
Search the BSSID of the Access Point(router) you want to crack. There are few ways to search for the Access Point BSSID but I prefer to use the inbuilt reaver search method which shows the list of WPS vulnerable BSSID only.
In the console type this following command and press enter:
Step 4: Lets start Cracking
I suggest you to try to crack the ones which have WPS lock disabled or say “NO” in WPS Locked column. It may also work if it says YES but I am not sure of that. For that, copy the BSSID of the target AP and also keep note of its channel and in the console and type the following and Enter:
Now just wait or have some coffee and let Reaver do its magic. It might take from 2 hours to 10 hours or more. There are 8 numeric digits of WPS but due the fact that WPS authentication protocol cuts the pin in half and validates each half separately. Since the last digit of pin is a cheksum value which can be calculated on the basis of previous value there are 10^4=10,000 possible values for first half and then 10^3=1000 values for the last pin. So the WPS pin code can be calculated in 11,000 possible pin code. Some AP can check the WPS pin in the rate of 1 pin per second and some take more so the time depend upon the AP and even the network connection strength depends too.
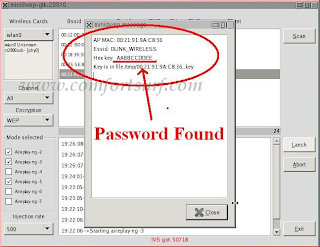
When the PIN is successfully brute-forced Reaver will show you the WPS PIN and the plain password of the AP like in the below screenshot.

I recommend you to keep note of the WPS pin so that if the password is changed again you can hack that in few seconds the next time by using the following process.
Error Section:
If you are getting the following error then check the corresponding solution for that.
This feature exist in most of the router for the easy setup process through the WPS pin which is hard-coded into the wireless access point. Reaver takes the advantage of a vulnerability in WPS. Thanks to Craig Heffner for releasing an open-source version of this tool named Reaver that exploits the vulnerability. In simple tone, Reaver tries to bruteforce the pin; which in result reveal WPA or WPA2 password after enough time.
What You’ll Need
You do not have to be a expert at Linux or in even using computer. The simple command-line (console ) will do all the things. But you may need a lot of time for this process and also some luck. The brute force may take from 2 hours to more than 10 hours too sometimes. There are various ways to set up reaver but here are the requirement for this guide.
- Backtrack OS. Backtrack is a bootable Linux distribution with lots of pen-testing tools. You can use various other Linux distribution but I prefer backtrack. If you don`t know how to install backtrack then please check this link first.
- A computer and wireless network card. I cannot guarantee if this will work with all the internal wireless card but i recommend a external wireless card.
- A lot of Patience. The process is simple but brute forcing the PIN takes a lot of time. So you have to be patience. Kicking the Computer won’t help you this time.
Now you should have a backtrack OS ready for action.
Step 1: Boot into BackTrack
You can use any method to boot into backtrack; like from live cd, VMware, dual boot, etc. So, just boot it first into the GUI mode and open up a new console(command line) which is in the taskbar. So just boot into backtrack. During the boot process, BackTrack will prompt you to to choose the boot options. Select “BackTrack Text – Default Boot Text Mode” and press Enter.
After some time Backtrack will take you into a command line prompt where you should type startx and press Enter. BackTrack will boot will into Graphical User Interface (GUI) mode.
Step 2: Install Reaver(Skip this step if you are using BackTrack 5)
Reaver should be already installed in the Backtrack 5 but if you are using older backtrack or any other Linux distribution you can install Reaver by using few steps below.
- First Connect your BackTrack to the internet. For WiFi connection go to Application > Internet > Wicd Network Manager
- Select your network and click connect and input your password if necessary, click OK and click CONNECT the second time.
apt-get update
apt-get install reaverNow if everything worked fine you will get a freshly installed Reaver tool. Now if you are testing it in your own system then please go to Wicd Network Manager and Disconnect yourself first.
Step 3 : Gather Information
Before launching the Reaver attack you need to know your target wireless network name, BSSID ( it is the series of unique letters and number of a particular router) and its channel number. So to know this make your wireless card into monitor mode and gather the required information of the access points. So let us do all these things.
First lets find your wireless card. Inside terminal or console, type:
airmon-ngPress Enter and there you should see a list of interface names of different devices. There should be a wireless device in that list you you have connected it to BackTrack. Probably it may be wlan0 or wlan1.
Note: To connect your wireless network card into WMware. Firstly, connect it to the USB and then you will see a small USB icon like in the figure in the top right of VMware. Then, right click on it and click connect. At last, USB sign will turn into green colour and start to glow.
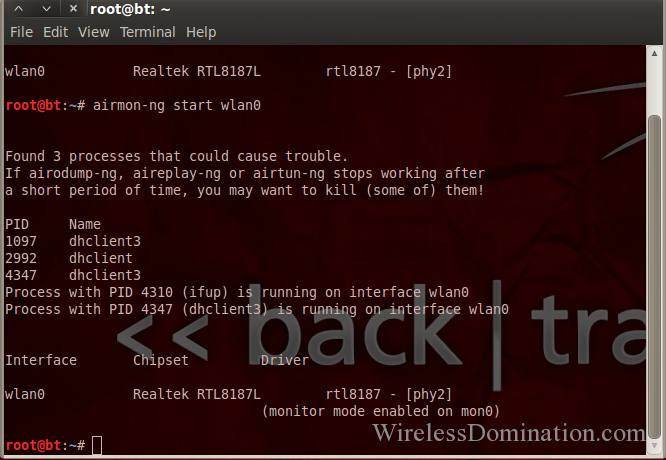
Enable monitor mode. Supposing your wireless card interface name as wlan0, type this command in that same console.
airmon-ng start wlan0This code will create a new monitor mode interface mon0 like in the screenshot below which you want to keep note of.
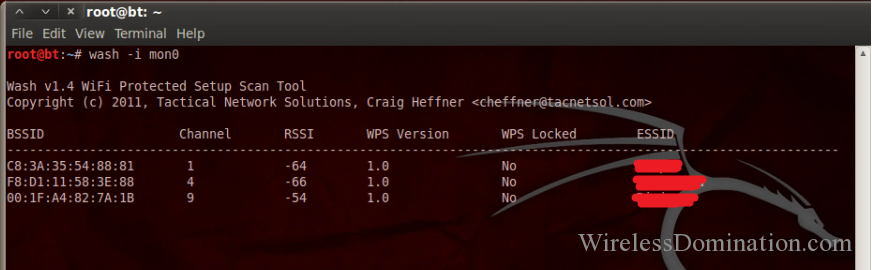
Search the BSSID of the Access Point(router) you want to crack. There are few ways to search for the Access Point BSSID but I prefer to use the inbuilt reaver search method which shows the list of WPS vulnerable BSSID only.
In the console type this following command and press enter:
wash -i mon0You will see the list of wireless networks that support WPS which are vulnerable to Reaver as seen in the screenshot below. After few minutes you can stop the scan by pressing Ctrl+C.
Step 4: Lets start Cracking
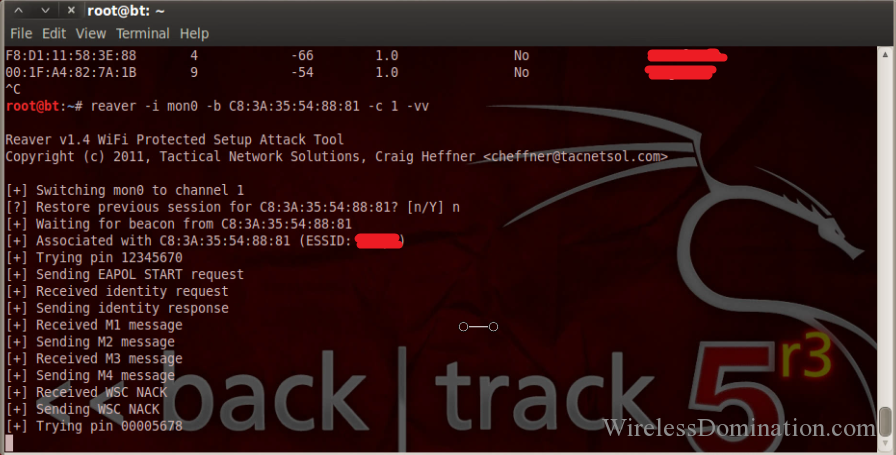
I suggest you to try to crack the ones which have WPS lock disabled or say “NO” in WPS Locked column. It may also work if it says YES but I am not sure of that. For that, copy the BSSID of the target AP and also keep note of its channel and in the console and type the following and Enter:
reaver -i monitormode -c channel -b targetbssid -vvFor My Case the monitor mode will be mon0 channel would be 1 ,targetbssid would be C8:3A:35:54:88:81 and -vv is written to show the current statistic of the attack like percentage completed, currently brute forcing PIN and so on; so we will type the following and enter:
reaver -i mon0 -c 1 -b C8:3A:35:54:88:81 -vvPress Enter and if everything goes right then you will see the attack process like in the screenshot below. Please note that you will not get “Restore previous session…” like me because I have already tried to crack it so, it is prompting me to either to resume from that paused point or not. Your progress will also be saved if your press Ctrl+C. It will prompt you the same if you again hit the same above command and you can resume it from there.
Now just wait or have some coffee and let Reaver do its magic. It might take from 2 hours to 10 hours or more. There are 8 numeric digits of WPS but due the fact that WPS authentication protocol cuts the pin in half and validates each half separately. Since the last digit of pin is a cheksum value which can be calculated on the basis of previous value there are 10^4=10,000 possible values for first half and then 10^3=1000 values for the last pin. So the WPS pin code can be calculated in 11,000 possible pin code. Some AP can check the WPS pin in the rate of 1 pin per second and some take more so the time depend upon the AP and even the network connection strength depends too.
When the PIN is successfully brute-forced Reaver will show you the WPS PIN and the plain password of the AP like in the below screenshot.
I recommend you to keep note of the WPS pin so that if the password is changed again you can hack that in few seconds the next time by using the following process.
reaver -i (monitor interface) -b (BSSID) -c (channel) --pin=(8 digit pin) -vvExample:
reaver -i mon0 -b 11:22:33:44:55:66 -c 1 --pin=12345678 -vvSo now the error part as you might get a bunch of error depending upon your conditions. You might get some timeout but it is normal but if you are getting other errors then see the below Error section for that
Error Section:
If you are getting the following error then check the corresponding solution for that.
- If 10 consecutive unexpected WPS errors are encountered, a warning message will be shown. Since this may be a sign that the AP is rate limiting pin attempts, a waiting command can be issued that will occur whenever these warning messages appears by issuing the following command:
reaver -i mon0 -b 00:01:02:03:04:05 --fail-wait=360
- The default receive timeout period is 5 seconds. This timeout period can be set manually if necessary (minimum timeout period is 1 second):
reaver -i mon0 -b 00:01:02:03:04:05 -t 3
- The default delay period between pin attempts is 1 second. This value can be increased or decreased to any value. Please note that 0 means no delay:
reaver -i mon0 -b 00:01:02:03:04:05 -d 0So here ends the tutorial on how to crack wireless network easily using reaver. Good Luck Hacking…!!!


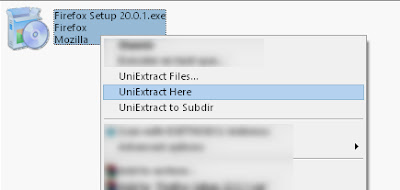
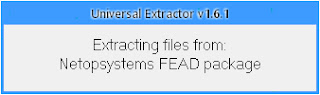
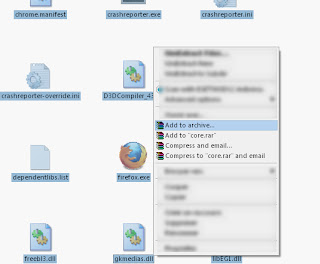
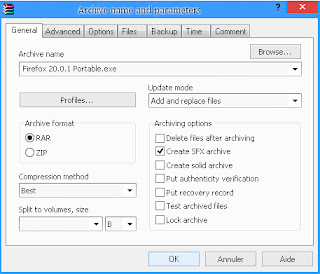
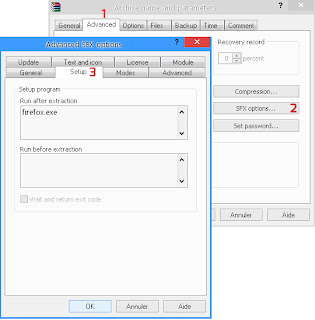
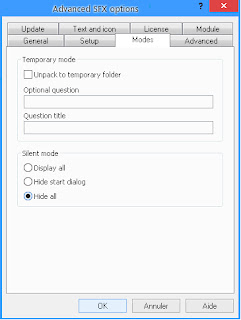
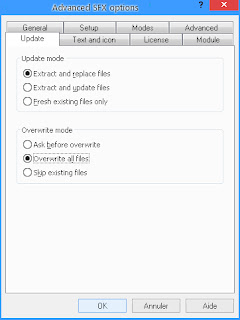
 Portable Apps are a packaged or pre-packaged programs that has been packed by a user so you can use on your USB thumb directly without any installation required. Portable Apps can help you solve the problem of transfering them from a PC to another using your USB flash drive and running them directly from it. If you are wondering how PortableApps website can create Portable Software packages, then you can do it too by following this tutorial which is about How to Create Portable Apps using Winrar and Universal Extractor.
 When
you're away from your PC you can't control it since your hand will not
reach the mouse or keyboard, that moment especially when you're watching
a movie it will be hard to do that. In this article, I'm writing about 2
Ways to Control your PC Using your Hand Gestures with Webcam (it's most
likely the Air Gesture of Galaxy S4 but for PC) and with this 2 ways
you can easily control Google Chrome or Windows through your hands away
from your computer.
When
you're away from your PC you can't control it since your hand will not
reach the mouse or keyboard, that moment especially when you're watching
a movie it will be hard to do that. In this article, I'm writing about 2
Ways to Control your PC Using your Hand Gestures with Webcam (it's most
likely the Air Gesture of Galaxy S4 but for PC) and with this 2 ways
you can easily control Google Chrome or Windows through your hands away
from your computer.