With the introduction of Windows 8, a lot of brand-new touch-friendly features have been added to make the operating system enjoyable to use on touch-enabled devices. However, for typical laptops which only have touchpads for their input, it may be a bit confusing as to how to move your mouse in order to achieve the same results. Therefore, with some tips and drivers in hand, here is how you can easily take advantage of Windows 8′s new Modern UI goodies.
Synaptics Drivers
Before we begin, it’s important to note that Windows 8 does support some touchpad gestures as well, in addition to simply pushing your mouse pointer to certain areas of your screen. There’s nothing you need to do if you bought your computer with Windows 8 already installed, but if you upgraded to Windows 8 yourself, you may need to go to Synaptic’s website and download their latest drivers to enable gesture support.
Charms Bar

The Charms bar is what appears on the right side of your screen to access application and system settings, the start button, and a few other items. Touch-screen users can reach it by swiping to the left from the right edge of the screen. However, touchpad users have three options – either push your mouse pointer into the top right or bottom right corner and then move it to the center of the right edge, put your finger on the right edge of your touchpad and swipe inward, or hit Win + C on your keyboard.
App Switcher
Accessing the app switcher is very similar to how the Charms bar is accessed, except on the opposite side. Therefore, touchscreen users can swipe to the right from the left edge of their screen. Touchpad users can push their mouse pointer into the top left or bottom left corners and then move to the center of the left edge, put your finger on the left edge of your touchpad and swipe inward, or hit Win + Tab on your keyboard. One thing to note – all desktop applications are grouped together into the “Desktop” app, so switching between those desktop applications can still be achieved with the trusty Alt + Tab keyboard combination.
App Bar

If you would like to access the App bar of a native Windows 8 app, you have slightly different options. Touch-screen users can simply swipe down from the top edge of their screen, and touchpad users can do the same thing by swiping down from the top edge of their touchpad. You can also right-click anywhere on an app, or hit the Win + Z key combination.
Horizontal Scrolling
Horizontal scrolling is another feature in Windows 8 which can be easily accessed. Both touch-screen and touchpad users can do horizontal scrolling by swiping two fingers to either the left or right. If you are using a mouse, you can horizontally scroll by scrolling the wheel up or down. The reasoning why scrolling the wheel up or down corresponds into horizontal scrolling is because the start screen as well as all Windows 8 apps expand horizontally rather than vertically.
Zooming And Rotation
You can also zoom in and out as well as rotate. Zooming in and out can be achieved by placing two fingers on the touchpad and then spreading them out or putting them together. You can also use the Ctrl and + keyboard combination to zoom in, or the Ctrl and – keyboard combination to zoom out. Rotation can be accomplished by using two fingers and then turning them to mimic rotating a circle. Rotation doesn’t have a keyboard shortcut, however.
Turning Them Off

While it’s cool to have these gestures to get easier access to Windows 8′s UI, it may get in the way of your productive habits if you tend to swipe around on your touchpad in much the same way as the gestures defined by Windows 8. If you need to turn them off, there’s a way to change entries in the registry which control whether the gestures are enabled or disabled. To do this, open up Notepad and copy and paste the following code into it:
Windows Registry Editor Version 5.00
[HKEY_CURRENT_USER\Software\Synaptics\SynTPEnh\ZoneConfig\TouchPadPS2\Right Edge Pull]
"ActionType"=dword:00000000
[HKEY_CURRENT_USER\Software\Synaptics\SynTPEnh\ZoneConfig\TouchPadPS2\Left Edge Pull]
"ActionType"=dword:00000000
[HKEY_CURRENT_USER\Software\Synaptics\SynTPEnh\ZoneConfig\TouchPadPS2\Right Edge Pull Extended Zone]
"ActionType"=dword:00000000
[HKEY_CURRENT_USER\Software\Synaptics\SynTPEnh\ZoneConfig\TouchPadPS2\Top Edge Pull]
"ActionType"=dword:00000000
Then save that file somewhere on your computer as “gestures.reg”. Just make sure to choose “All file types” in the Save As dialog and then typing out the whole filename, including the file extension. Then find the file you just saved and run it, clicking on Yes for all warnings that pop up. After it completes, you’ll need to restart your computer to load the new settings.
You can also enable them again if you previously disabled them using the same trick. However, you’ll need to paste this code into your gestures.reg instead:
Windows Registry Editor Version 5.00
[HKEY_CURRENT_USER\Software\Synaptics\SynTPEnh\ZoneConfig\TouchPadPS2\Right Edge Pull]
"ActionType"=dword:00000002
[HKEY_CURRENT_USER\Software\Synaptics\SynTPEnh\ZoneConfig\TouchPadPS2\Left Edge Pull]
"ActionType"=dword:00000002
[HKEY_CURRENT_USER\Software\Synaptics\SynTPEnh\ZoneConfig\TouchPadPS2\Right Edge Pull Extended Zone]
"ActionType"=dword:00000002
[HKEY_CURRENT_USER\Software\Synaptics\SynTPEnh\ZoneConfig\TouchPadPS2\Top Edge Pull]
"ActionType"=dword:00000002
Conclusion
http://www.youtube.com/watch?v=_ZGGWAjpM_M
Hopefully you can make better use of your new Windows 8 system now that you know about these tips for using the operating system with a touchpad. While I still think that the OS is better suited for actual touch-screens, it’s still easy to remain productive with just a typical laptop touchpad. And if these wordy instructions didn’t click in your mind, maybe this video will help you a bit. Also, if you have any other Windows 8 issues, check out this article, or if you’re just getting started with the new operating system, check out our guide on Windows 8!
What do you use with your Windows 8 system, a touchpad, touchscreen, or both? How do you feel about any of these input options? Let us know in the comments!
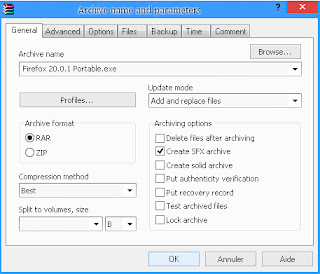
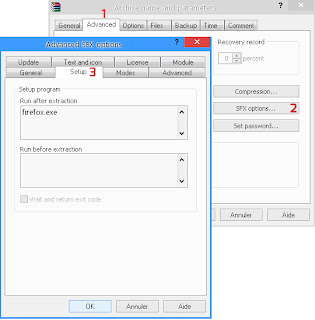
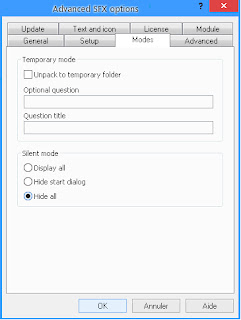
 Portable Apps are a packaged or pre-packaged programs that has been packed by a user so you can use on your USB thumb directly without any installation required. Portable Apps can help you solve the problem of transfering them from a PC to another using your USB flash drive and running them directly from it. If you are wondering how PortableApps website can create Portable Software packages, then you can do it too by following this tutorial which is about How to Create Portable Apps using Winrar and Universal Extractor.
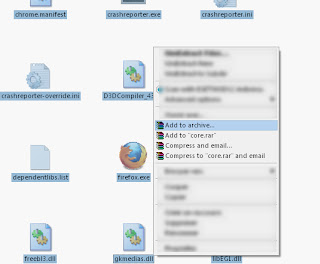
 When
you're away from your PC you can't control it since your hand will not
reach the mouse or keyboard, that moment especially when you're watching
a movie it will be hard to do that. In this article, I'm writing about 2
Ways to Control your PC Using your Hand Gestures with Webcam (it's most
likely the Air Gesture of Galaxy S4 but for PC) and with this 2 ways
you can easily control Google Chrome or Windows through your hands away
from your computer.
When
you're away from your PC you can't control it since your hand will not
reach the mouse or keyboard, that moment especially when you're watching
a movie it will be hard to do that. In this article, I'm writing about 2
Ways to Control your PC Using your Hand Gestures with Webcam (it's most
likely the Air Gesture of Galaxy S4 but for PC) and with this 2 ways
you can easily control Google Chrome or Windows through your hands away
from your computer.

